Want more streamlined developer workflow with git? no worries, we got the ultimate Trio- Husky, Lint-Staged and Commitlint
I assume you've already configured prettier and eslint for formating and linting in your project. (if you're using next.js they will be pre-configured.
#. Concept
We will be utilizing Git Hooks for this. What are Git Hooks?
Basically Git Hooks are scripts that run automatically whenever a particular event occurs in a git repository. Git provides several Git Hooks such as pre-commit, pre-push, commit-msg, post-commit, etc.
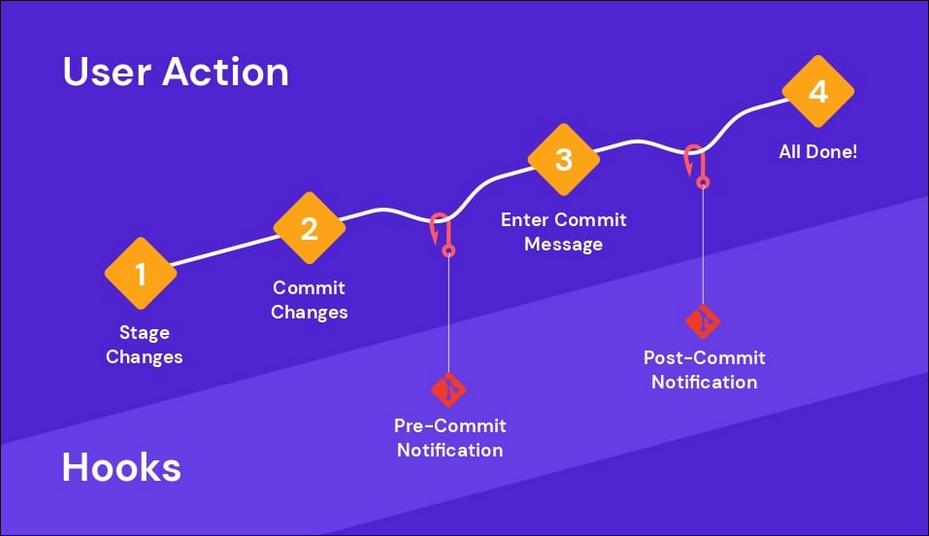
For example: when we make a commit to a git repository, pre-commit hook will get triggered and we can write polices in that script, and if those polices violates, commit will get cancelled and shows the cause.\
(you will get a better idea from below diagram).

So that's basically it, we can use a tool like husky to easily manage these git-hooks.
Git Commit Conventions:
It is a set of guidelines for writing commit messages that are clear, concise, and informative. It consists of a well-defined rule set. By following them, we can maintain a better commit log.
Here is the basic structure of a commit message would look like:
bashConventional-commits have specifications for each property in a commit message (type, scope, description, body, footer). You can get a better understanding of those conventions by this link.
We will be using a tool called commitlint for managing conventional-commits.
#. Huksy
With husky we can define git hooks as (scripts) we need. Later, husky will take care of executing hooks at their appropriate execution time like we discussed earlier.
Install Huksy as dev dependency
(we can use any package manager, I will be using npm for the tutorial.)
bash
Initialize Husky
Initialization will create a pre-commit script in .husky/ dir and updates the prepare script in package.json.
bash
#. Lint-staged
Lint-Staged is a useful tool to run linters in staged files only. Without this package, linters run through the whole project and consume unnecessary time to check already linted codes.
Create .lintstagedrc.json file in the root level
This is the base configuration for specifying which linter should run for which format of file. here is the basic configuration:
.lintstagedrc.jsonUpdate ./husky/pre-commit file
We need to run lint-staged with this config, to do so- update pre-commit file with this script:
pre-commit
This will run prettier and eslint for specified staged files. Thus we can see if something is off before pushing to remote repository.
#. Commitlint
bash
Create commitlint.config.ts file in the root level
This is the configuration file for conventional-commits. You have to follow these rules when you are adding a commit.
You can change the rules as you like, here are the available rules.
commitlint.config.tsCreate commit-msg file inside the .husky folder
This script will run before pre-commit so we can see if there is any issue with our commit convention:
commit-msg
Congratulations, You have successfully streamlined your developer workflow using task automation.
Now try to add a commit, and you will the Trio doing their ultimate job for you.